Why aluminum c-channel or flat stock? It shows everything, and it can be looked at as a predictor to where the body filler will end up being. When a vehicle is finished, and you sight down the side of it, you're looking down entire sections. If this aluminum covers the length of that section, you can make the body work nearly perfect. This is absolutely a key to making the body work perfect.
In order to get the body actually straight, including across multiple panels, it’s important to have an accurate way to check the work in every step. This is where these aluminum pieces come into play. They should be used at every single step, from adjusting panels, to shrinking high spots down, to moving panel edges around, to body work ( a lot) and even when block sanding primer.
Depending how much flexibility is needed is what determines if it’s flat stock or c-channel. These pieces need to span across as much of the body as possible, and be able to flex enough to follow the shape that the body is supposed to be. The flatter and straight bodies usually require a c-channel, since it’s more rigid. The curvier bodies require flat stock, since it’s able to flex more.
The length of the flat stock needs to span the entire area being checked. This does not mean individual panels, or just a small area where two panels meet. This might mean an entire door and fender. It can be looked at like this; when you sight down the finished car, and don’t want to see any waves or panel edges diving in through a section, the aluminum needs to cover that entire section.
The correct piece should take a small amount of pressure to conform to the shape of the are you’re checking. If it’s too rigid, the center will want to bow out too much. If it’s too flimsy, the aluminum will want to follow the shape a little too easily.
To see if there’s a high spot somewhere, you will be able to see the aluminum rocking on the high spot. When you move the one end of the aluminum closer to the panel, the area on the opposite side of the high spot will be pushed away from the panel. By moving the aluminum in and out slowly, and watching what everything is doing, you’ll be able to narrow down exactly where the high spot is. This can and should be used to check body work as well. And a lot of times, the high spot is very subtle, and it isn’t very easy to see exactly where it’s high, and where it’s low. The high or low spots are in relation to the entire area the aluminum is spanning, not just the individual panel.
When holding the aluminum against the vehicle, it should usually be held near the ends, and don’t cheat and hold it so that it follows the panels better. If an area is low, it’s low.
Of anything, this is one of the most important parts of body work. Work should always and constantly be checked. It really is the difference maker. It’s impossible to feel if an entire area is barely low and spread out over 3 or 4 feet. That is something that you will see in the paint, and the only way to know it’s there in body work is by checking it with these long sticks of aluminum.
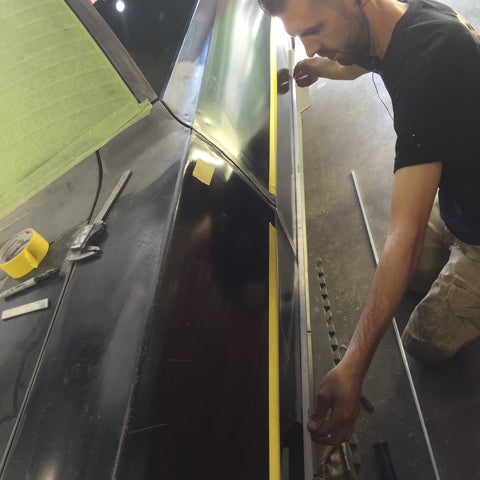
Notice in the images, the amount of the body these aluminum pieces are covering. When you sight down the body after it's painted, this is what you see, so you must make sure this large of an area is correct.